Game Information
MCG
| fourth Quarter | |||
|---|---|---|---|
| Time | Team | Play | Score |
| 30:06 |  | B. Long Goal | 62 - 120 |
| 28:40 |  | J. van Rooyen Goal | 62 - 114 |
| 22:36 | | B. King Goal | 56 - 114 |
| 21:12 | | W. Graham Behind | 56 - 108 |
| 19:46 | | E. Read Goal | 56 - 107 |
| 18:22 | | L. Weller Behind | 56 - 101 |
| 16:05 | | J. Melksham Behind | 56 - 100 |
| 14:50 | | H. Langford Goal | 55 - 100 |
| 12:12 | | B. King Goal | 49 - 100 |
| 9:58 | | S. Flanders Goal | 49 - 94 |
| 7:34 | | B. Fritsch Behind | 49 - 88 |
| 2:36 | | T. Miller Goal | 48 - 88 |
| third Quarter | |||
| Time | Team | Play | Score |
| 34:39 | | W. Graham Goal | 48 - 82 |
| 34:01 | | Rushed | 48 - 76 |
| 32:03 | | J. Melksham Behind | 47 - 76 |
| 30:41 | | K. Chandler Goal | 46 - 76 |
| 27:53 | | C. Petracca Goal | 40 - 76 |
| 25:58 | | L. Weller Goal | 34 - 76 |
| 24:39 | | H. Sharp Goal | 34 - 70 |
| 22:36 | | J. Henderson Behind | 28 - 70 |
| 20:03 | | J. Witts Goal | 27 - 70 |
| 18:03 | | B. King Goal | 27 - 64 |
| 14:12 | | B. King Goal | 27 - 58 |
| 12:58 | | T. Miller Goal | 27 - 52 |
| 8:56 | | T. Miller Goal | 27 - 46 |
| 5:50 | | H. Sharp Goal | 27 - 40 |
| 5:02 | | B. King Behind | 21 - 40 |
| 3:11 | | B. King Behind | 21 - 39 |
| second Quarter | |||
| Time | Team | Play | Score |
| 28:30 | | Rushed | 21 - 38 |
| 27:53 | | B. Fritsch Behind | 20 - 38 |
| 22:25 | | J. Jeffrey Behind | 19 - 38 |
| 20:56 | | J. Noble Behind | 19 - 37 |
| 17:15 | | B. Fritsch Behind | 19 - 36 |
| 13:25 | | N. Anderson Goal | 18 - 36 |
| 11:57 | | J. Melksham Goal | 18 - 30 |
| 10:42 | | Rushed | 12 - 30 |
| 8:55 | | T. Miller Behind | 11 - 30 |
| 4:25 | | T. Sparrow Behind | 11 - 29 |
| first Quarter | |||
| Time | Team | Play | Score |
| 30:36 | | B. Humphrey Behind | 10 - 29 |
| 28:45 | | B. Humphrey Goal | 10 - 28 |
| 26:01 | | B. King Behind | 10 - 22 |
| 22:40 | | J. Noble Goal | 10 - 21 |
| 19:39 | | J. Bowey Goal | 10 - 15 |
| 17:37 | | H. Langford Behind | 4 - 15 |
| 16:56 | | S. Flanders Behind | 3 - 15 |
| 13:34 | | C. Petracca Behind | 3 - 14 |
| 12:14 | | N. Holman Behind | 2 - 14 |
| 10:02 | | J. Walter Goal | 2 - 13 |
| 7:57 | | Rushed | 2 - 7 |
| 5:13 | | W. Graham Goal | 1 - 7 |
| 3:44 | | B. Long Behind | 1 - 1 |
| 2:26 | | M. Gawn Behind | 1 - 0 |
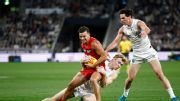
Ollie Henry cuts off the Gold Coast rebound with a smother and follows up with a goal.
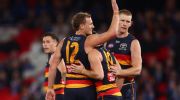
A nine-goal first quarter from the Crows set up a big win over the Bulldogs on Thursday night, but is it enough for them to be considered premiership contenders?
Inspirational Adelaide captain Jordan Dawson has produced a masterful performance to power the Crows to a 57-point thumping of the stunned Western Bulldogs.
West Coast coach Andrew McQualter has backed the five-year ban handed down to a fan for throwing a lemon at star Eagles defender Reuben Ginbey.
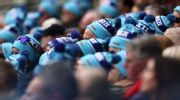
A sea of blue beanies has streamed into the Melbourne Cricket Ground as punters join sporting royalty to farewell AFL legend and motor neurone disease crusader Neale Daniher.
Western Bulldogs coach Luke Beveridge has urged the AFL to keep player movement confined to the end of the season amid the club's pursuit of Port Adelaide star Zak Butters.
| POS | Team | Pts. | % | Form |
|---|---|---|---|---|
| 1 |
 FRE FRE
|
48 | 147.9 | WWWWW |
| 2 |
 SYD SYD
|
44 | 147.3 | WWLWW |
| 3 |
 GEEL GEEL
|
36 | 123.1 | WWLLW |
| 4 |
 HAW HAW
|
34 | 113.2 | LLWWL |
| 5 |
 ADEL ADEL
|
32 | 112.4 | WWLWW |
| 6 |
 MELB MELB
|
32 | 102.3 | WWLLW |
| 7 |
 WB WB
|
32 | 90.7 | LWWWL |
| 8 |
 SUNS SUNS
|
28 | 107.2 | WWLLL |
| 9 |
 BL BL
|
28 | 106.2 | WLLLW |
| 10 |
 GWS GWS
|
24 | 103.2 | LWLWW |
| 11 |
 COLL COLL
|
22 | 99.2 | LLWLL |
| 12 |
 STK STK
|
20 | 101.9 | LWLLL |
| 13 |
 CARL CARL
|
20 | 88.7 | LWWWW |
| 14 |
 NMFC NMFC
|
20 | 87.7 | LLLWL |
| 15 |
 PORT PORT
|
16 | 101.4 | LLLLW |
| 16 |
 WCE WCE
|
16 | 71.3 | LWLWL |
| 17 |
 RICH RICH
|
8 | 60.4 | WLLWL |
| 18 |
 ESS ESS
|
4 | 71.7 | LLLLL |